Appearance
Single Sign-On (SSO) Authentication
RepoForge.io supports authentication using your organization's Single Sign-On (SSO) provider, allowing seamless and secure access for your team. This guide provides comprehensive instructions to enable and configure SSO on your RepoForge.io account.
Prerequisites
Before attempting to configure SSO, verify your account meets these criteria:
- Active Standard or Advanced subscription to RepoForge.io.
- Sufficient user seats available. If your account lacks available user seats, new users attempting their first login will receive an error message.
You can upgrade your account or add new users to your account at any time by visiting the Billing area of the RepoForge.io dashboard.
Enabling and Configuring SSO
- Login to your RepoForge.io dashboard.
- Navigate to SSO Configuration located in the sidebar.
- You will find the following configuration options:
Configuration Fields:
- Enable SSO Authentication: Toggle this option ON to activate SSO for your organization.
- Organisation Name: Enter a friendly name for your organization. Your users will use this to find your organisation at login.
- Client ID: Provided by your SSO provider; used to identify your application.
- Client Secret: Provided by your SSO provider; used for secure communication.
- Authorization URL: The URL to redirect users to during login.
- OAuth Token URL: Endpoint URL for generating access tokens.
- Userinfo Endpoint: Endpoint URL to retrieve user profile information.
- JWKS URI: Typically optional. Required if your provider demands it or if you limit RepoForge.io access to specific user groups.
Additionally, you will see two essential URLs displayed:
- Your Login URL: Share this with your users for logging into RepoForge.io via SSO.
- Your Callback URL: Required by your SSO provider during the configuration process.
Configuration Tutorials
Detailed setup tutorials for the following common SSO providers:
Google OAuth Setup
Go to the Google Cloud Console.
Select or create your project and navigate to APIs & Services → Credentials. If you haven't already, you will need to make your project internal to limit access to only those users in your organisation. You can do this under Audience → User Type → Make Internal. If you don't do this, anybody with a Google account will be able to log in to your RepoForge.io account.
Click Create Credentials → OAuth Client ID.
Configure the consent screen (if not already done).
Choose Web Application and enter:
- Authorized Redirect URIs: Paste the RepoForge.io Callback URL from your dashboard.
- Under Authorized JavaScript origins, enter
https://app.repoforge.io
Google provides your Client ID and Client Secret.
In your RepoForge.io dashboard, enter:
- Client ID: Google Client ID
- Client Secret: Google Client Secret
- Authorization URL:
https://accounts.google.com/o/oauth2/v2/auth - OAuth Token URL:
https://oauth2.googleapis.com/token - Userinfo Endpoint:
https://www.googleapis.com/oauth2/v3/userinfo - JWKS URI: Leave blank.
Auth0 setup
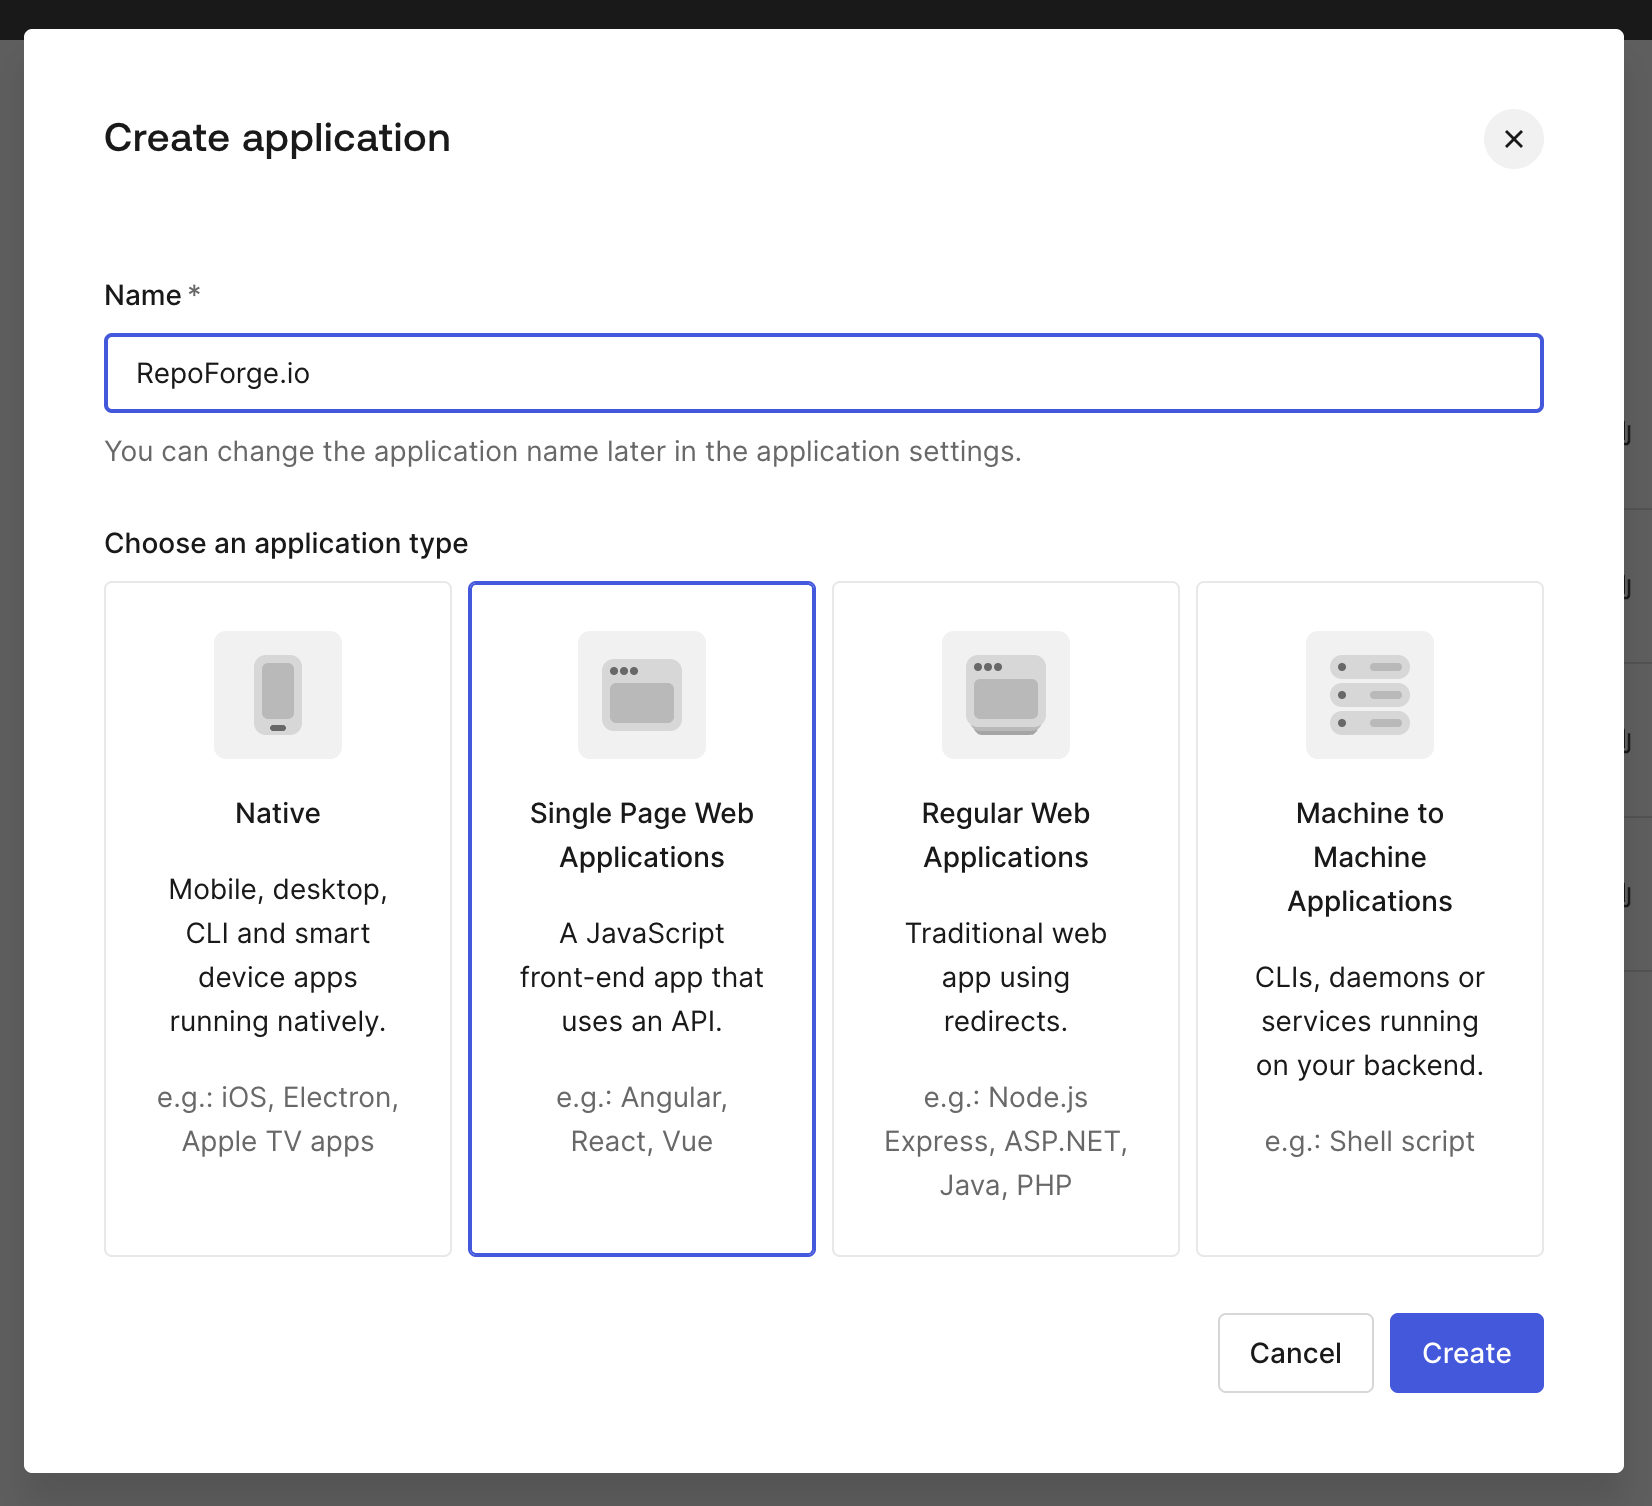
Create an application
To setup Auth0 as your RepoForge.io SSO provider, you'll first need to create an OAuth application. Log in to Auth0 and create a new Single Page Application. Give it a sensible name.
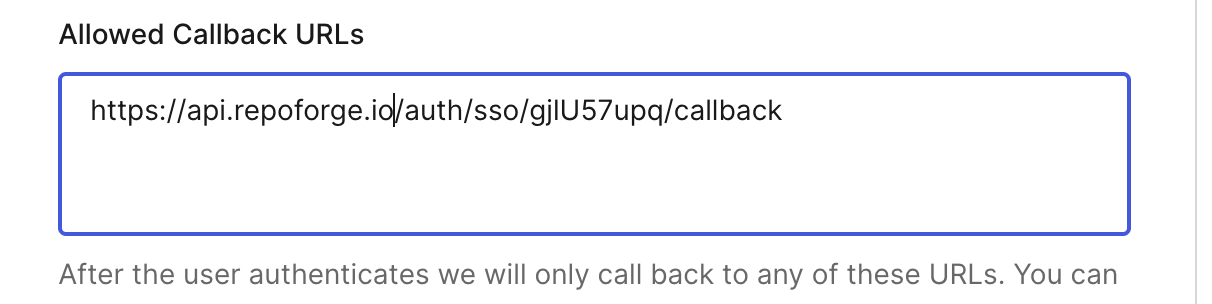
The Callback URL
In the settings of your Auth0 application, you'll see a field called Allowed Callback URLS. In this field, you should enter the callback URL provided in the RepoForge.io dashboard.
Individuals or businesses?
Auth0 has two configurations: Individuals and Business Users. You can select this from the Login Experience tab in the Auth0 dashboard.
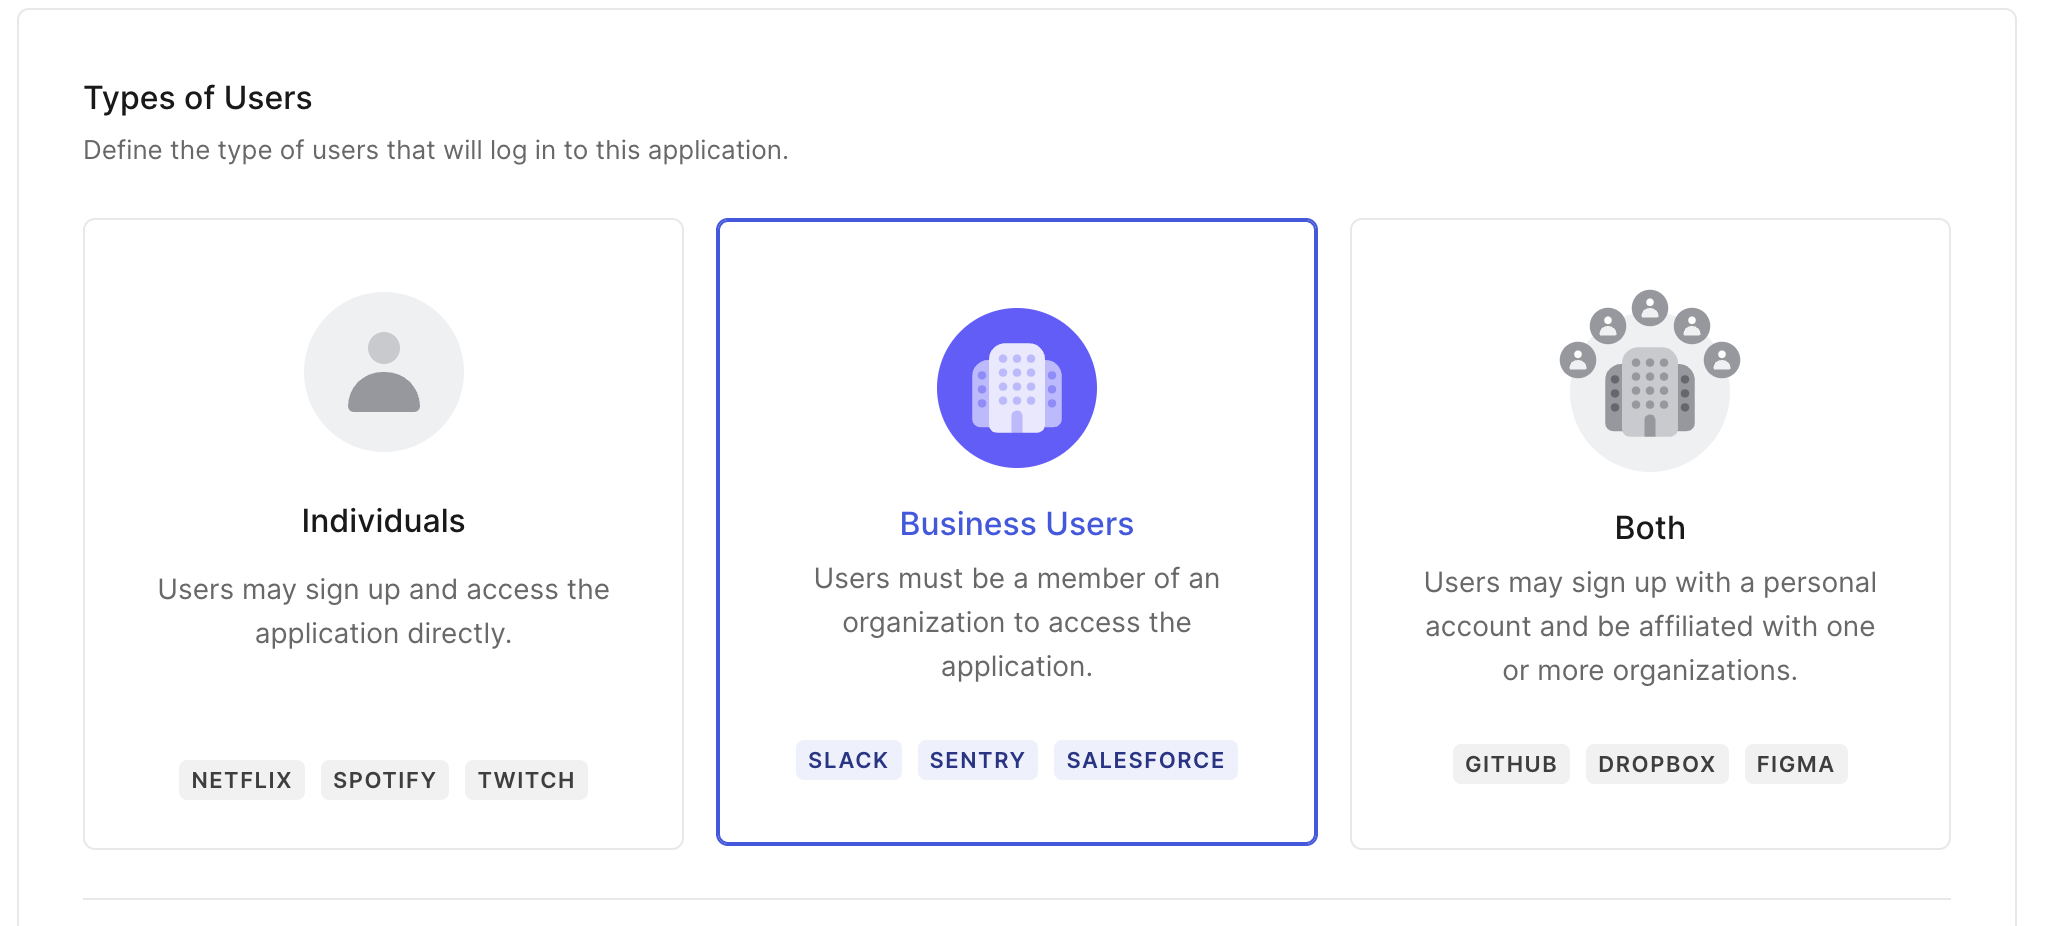
RepoForge.io supports either option here. Using the Individuals option means that anybody who is part of your organisation will be able to login to RepoForge.io You can limit access to RepoForge.io to only those users in a specific organisation in Auth0. However, please note that if you do this, you will need to provide the JWKS URI when you configure your application on RepoForge.io
Getting the configuration options for RepoForge.io
Once you've create your application and decided on the login experience, navigate to Settings. In this section, you'll find your Client ID and Client Secret that you'll need to specify in your RepoForge.io SSO Configuration.
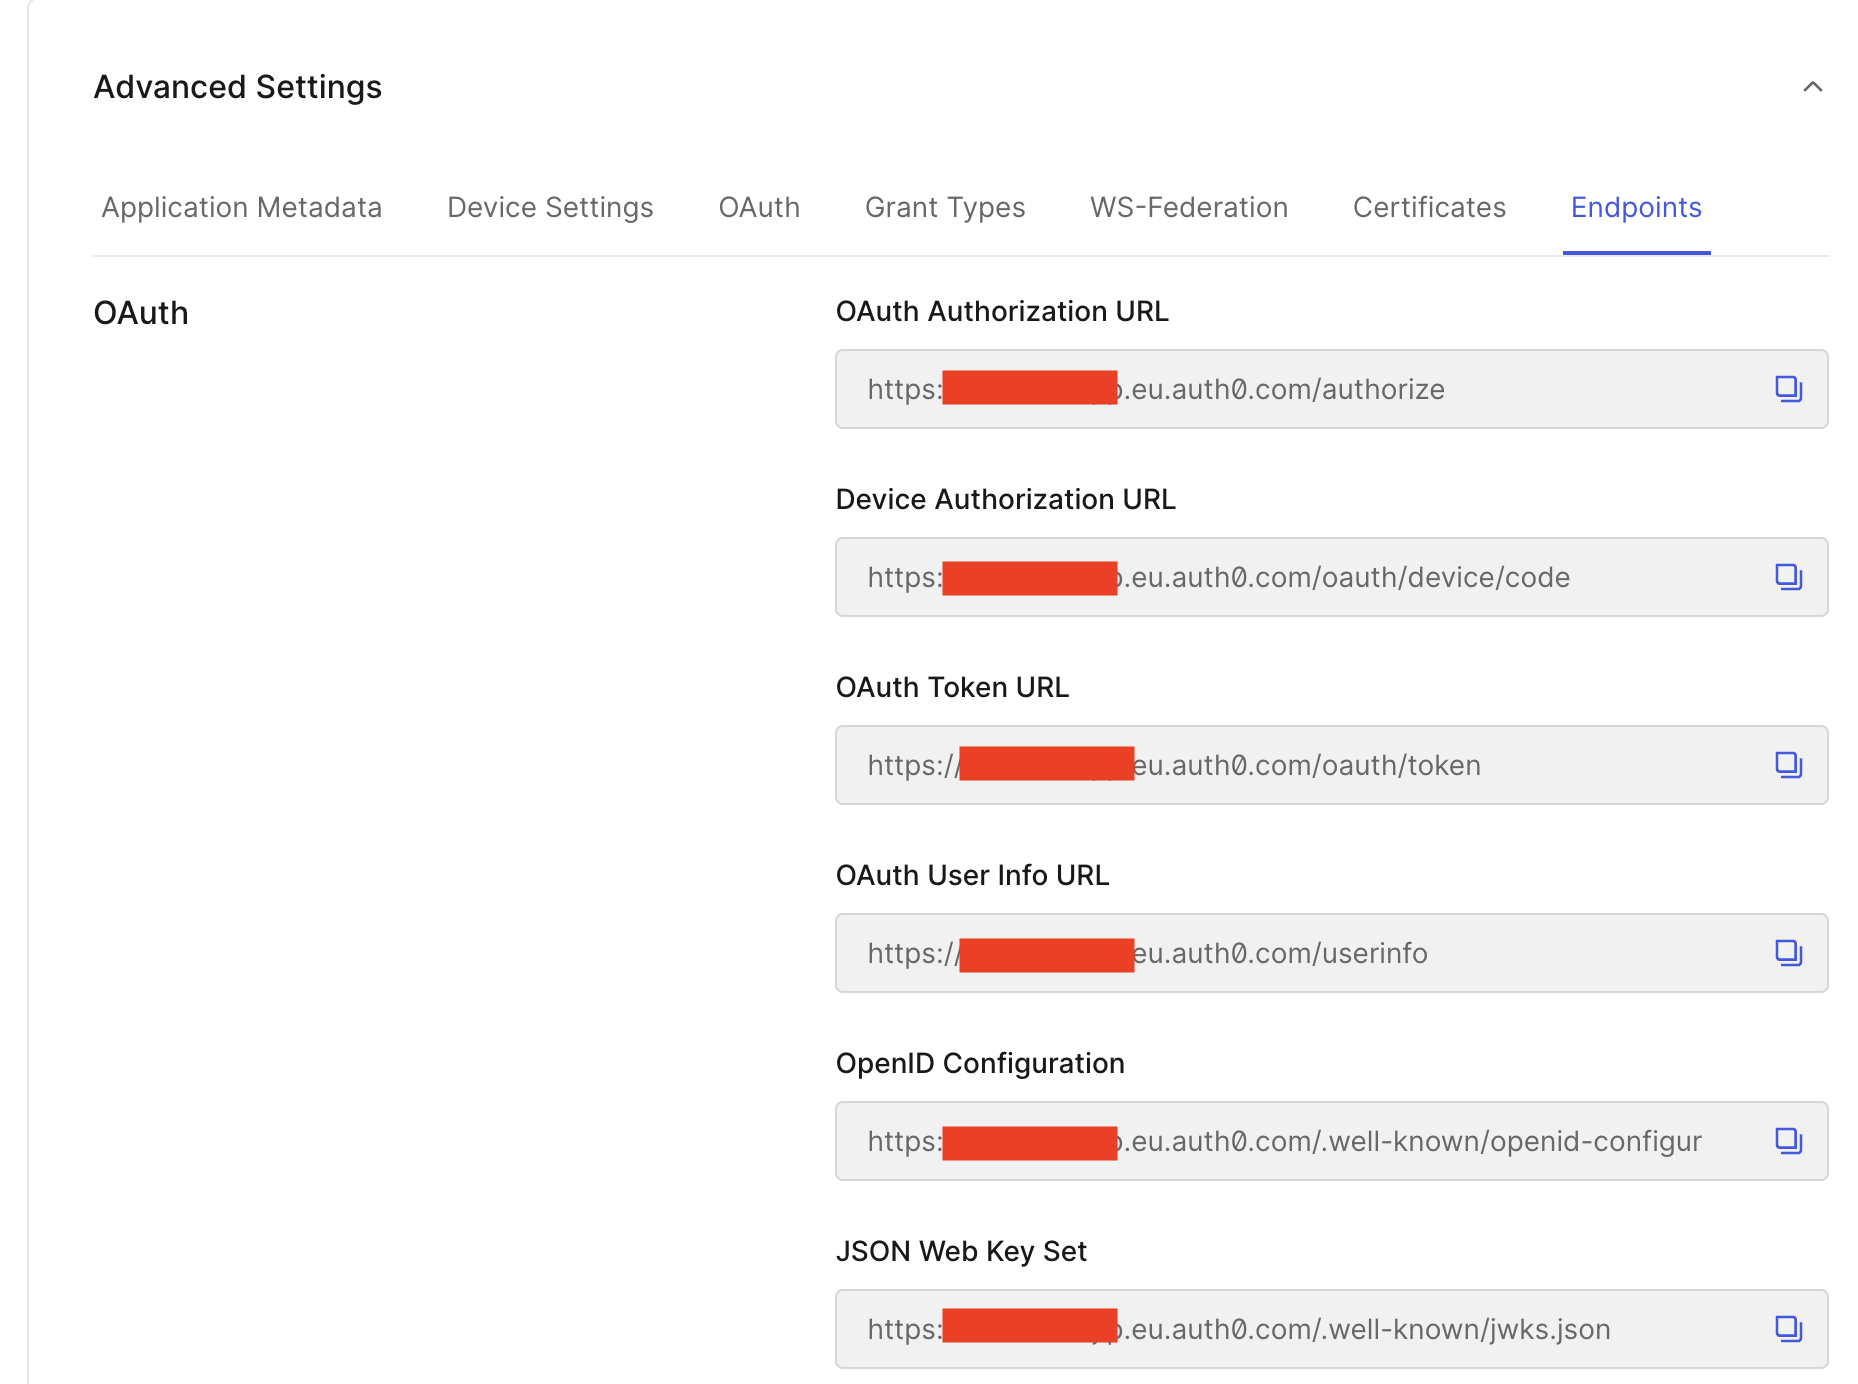
You'll also need a few other variables - still in the Settings area of Auth0, scroll down until you see Advanced Settings. There are a number of values here that you'll need to be able to configure RepoForge.io, under Endpoints
Configuring SSO in the RepoForge.io dashboard
Now that you have all the details, login to your RepoForge.io dashboard and fill out the form as follows:
- Enable SSO authentication: switch this on
- Organisation name: Enter a memorable name for your organisation. Your users will be able to use this to find the login page.
- Client ID: Auth0 Client ID, taken from the settings.
- Client Secret: Auth0 Client Secret, take from the settings.
- Authorization URL:
https://<your-domain>.auth0.com/authorize. You can find this under OAuth Authorization URL in the previous screenshot. - OAuth Token URL:
https://<your-domain>.auth0.com/oauth/token. This is also in the previous screenshot. - Userinfo Endpoint:
https://<your-domain>.auth0.com/userinfo. Taken from OAuth User Info URL - JWKS URI:
https://<your-domain>.auth0.com/.well-known/jwks.jsonSee previous note about Organizations in Auth0. If you chose the Individuals login experience, then you may leave this blank. However, if you chose Business Users then you must provide this value. It can be taken from JSON Web Key Set in the above screenshot.
Click the Save SSO Configuration button at the bottom of the page to commit your changes.
Additional SSO Providers
While this documentation covers GitHub, Google, and Auth0, RepoForge.io supports numerous other SSO providers such as GitHub, Azure and Okta. If you encounter difficulties during configuration, please raise a support request. Future updates to this documentation will include more provider tutorials.